In the 90s, no one knew they were supposed to scroll down a page.
Mice didn’t have scroll wheels, some people didn’t even have a mouse, and dial-up internet was the best thing since sliced bread.
Today, people know they’re supposed to scroll, and most people have blazing fast internet that can load complex pages in a snap.
As a result, websites are more complicated and fancier than ever before. However, creating your own website is actually easier and faster than surfing the net circa 1995.
We’ve created hundreds of websites over the years using every platform you can imagine. In doing so, we narrowed the process down to a science. Ready to learn how to create a website for free?
Let’s get started.
Create a Website for Free!Intuitive drag-and-drop website builder built to turn everyone into a website designer. Choose from hundreds of pre-designed templates and get started in a matter of minutes. Includes e-commerce functionality, hundreds of apps, artificial design intelligence, powerful analytics, and more. |
You have countless choices when it comes to building a website. But they’re not all created equal.
Some are too expensive, others require a lot of development experience, and even others are too simple with cookie-cutter options.
However, Wix is the most cost-effective and customizable website builder on the market.
Not only does it offer a user-friendly drag and drop interface, but you also get hundreds of free design templates you can use to get started, rather than starting from scratch.
You can also take advantage of Wix’s other features, including:
- Photo galleries
- E-commerce tools
- Apps to add functionality
- Wix ADI (artificial design intelligence)
- And powerful analytics
Wix websites are also optimized for small screens. Which… is critical because half of all internet traffic comes from mobile devices.
Whether you’re starting a side gig or a full-fledged new business, your time is valuable. And Wix empowers you to get your website up and running in just a few clicks with no coding or design expertise required.
Now that you know why we love Wix, let’s walk through how to create a website for free.
Step 1: Create a Wix Account
The first step is to create a Wix account. So, head to the homepage and click “Get Started”.
This takes you to a signup page where you can enter your email address and create a password. You can also sign in with Google or Facebook if you prefer.
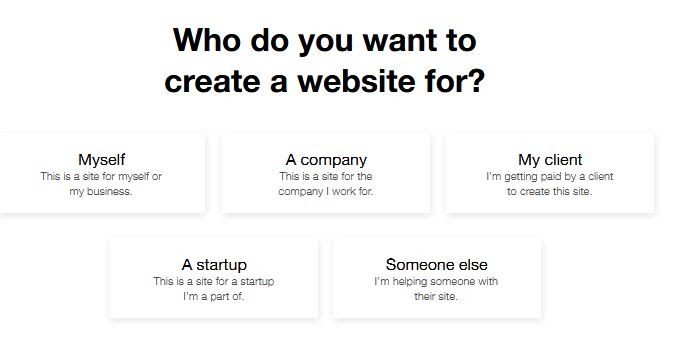
Next, you have to answer some questions about what kind of site you’re creating. These questions help Wix understand the type of website you’re after and it only takes a few seconds.
You can skip the questions if you want to, but it’s a good idea to let Wix do as much of the hard work as possible.
For example, Wix asks what you’re creating the website for:
They also ask if you’ve created a site before. Depending on your answers, Wix can tailor your experience to match what you’re interested in doing. From there, the wizard shows you your results.
If you get results that don’t quite fit what you’re looking for, no worries. Just click “back” at the bottom of the screen to change your answers.
When you’re done, you have two options: let Wix ADI make a site for you, or build the site on your own by using the Wix Editor.
Option 1: Let Wix ADI Build a Site for You
With Wix ADI, artificial design intelligence works to put together a website based on a design questionnaire.
You’ll start by answering a few questions about the pages and features you need on your website. Then, in a matter of minutes, Wix builds an entire site ready for you to start customizing.
Option 2: Use the Wix Editor to Build From Scratch
You can also bypass the ADI system and use the Wix Editor to build a site on your own. It’s not difficult but it does take more time since you have to create everything from scratch.
This is a smart option if you want to start with a clean slate.
So, Which Option Should You Choose?
You can easily create an excellent website with either option. However, it comes down to how much time you want to spend setting things up.
ADI is definitely the fastest approach since it creates all the pages for you. From there, you can replace the demo content with your own and you’re good to go.
But if you’re not in a hurry and want more design control and flexibility, the Wix editor is your best bet. You can start completely from scratch with a clean slate to let your ideas run wild.
And you don’t need to be a web design pro to use the Wix Editor. It’s easy to navigate, even for beginners and non-technical users.
So, both are excellent options. But it’s ultimately up to you.
If you choose ADI, follow the prompts on your screen and you’re good to go.
If you prefer doing things yourself, you can follow along with the rest of this guide as we walk through creating a website from scratch.
Step 2: Choose a Template
If you want to start from scratch, the next step is choosing a template. This part is really fun because you have hundreds of fully-customizable (and free!) options to choose from.
It’s important to keep in mind that you can customize just about everything including colors, fonts, patterns, photos, font size, image placement, headings, and more.
A template is just a starting point to jumpstart the design process. We’ll talk more about how to customize your template in the next step.
So for now, try to concentrate on each template’s general layout and overall functionality.
It may help to think of it as the frame of a house. Once you pour the foundation and construct all the walls, you can add your own colors, finishes, and decor to make it truly yours.
You can also narrow your search if you’re feeling overwhelmed by the number of options. You can filter based on business type, the type of products you want to sell (for e-commerce stores), and even your industry.
Alternatively, you can use the search bar to search for whatever you want.
Take time to explore a few different design options that might work for your business. One of the biggest downsides of Wix is that you can’t choose a new template after you pick one. So, really take your time here.
And remember, you can customize everything later on.
Once you find a template you like, click “view” to see it in action as a live website, or “edit” to add it to your website.
Once you make a decision, you’re ready for step three.
Step 3: Customize Your Template
Once you select “edit” Wix will take you to a new page where you can make changes to your template of choice. This is your opportunity to make the template your own using the drag and drop design tools on the left side of the page.
This is also where the real fun begins. The main editing menu will always be on the left side of the Editor screen. This is where you can make big changes like adding a new page or a blog.
However, you can also click on individual elements to make changes. For example, if you click on the image of the ice cream cone (or whatever image appears on your template of choice), Wix will prompt you to change it.
In other words, you can customize as much or as little as you want. The user-friendly Wix Editor puts you in the driver’s seat — and makes your journey easy by giving you clear directions and guidance.
Some basic changes you’ll want to make include changing the business address and hours. To make changes like this, find the placeholder text in the template and click on it. This will make an orange text editor box appear. Making changes is as simple as clicking inside the editor box and typing the correct address.
You’ll also want to add things like your business’s social links. To do this, just find the social menu on the template and click it. This pulls up a menu where you can add your own social links and change the settings if you desire.
Take your time to play with the editing options. You can modify the font size, change words to bold or italics, or choose a different font altogether.
You can also change the images. If you’re not quite thrilled with a placeholder image, just click on it and swap it out for an image that works better for your site. This can be a photo you took, a free image from a royalty-free site, or a substitute image from Wix’s library.
Some images are free, while others have various price points. Paid images have a little dollar-sign logo in the corner, so you can easily tell which images are free and which ones are paid.
In addition to images, you can also change the background, add pages to the main menu, and change the look of the menu. These tools are located on the left side of the template page, and they make editing and customizing your template incredibly easy.
Step 4: Add Pages
Do you want your site to have a blog? What about a contact page or an “about us” page? The Wix Editor makes adding these pages a snap.
To add a new page, go to the main Editor menu on the left side of the screen and click “menus and pages.” This will bring up a new window. At the bottom of that window, click “+ add page.”
This will give you the ability to add a variety of custom pages to your website.
Step 5: Add Apps
Just as Wix has hundreds of pre-made templates to choose from, it also offers hundreds of free and paid apps. These are extra features you can add to your site to make the visitor experience easier and more rewarding.
For example, if you run a restaurant, you probably want to add a menu to your website, along with a way for site visitors to make reservations online.
Other examples include live chat widgets, email marketing tools, QuickBooks or Hubspot integrations, online bookings, order management, pop-up forms, membership areas, shipping platforms, and various design flourishes to take your site design to the next level.
There are hundreds of Wix apps to choose from, all of which help extend the functionality of your website.
And the even better news is that they’re incredibly easy to install.
As with the other customization steps, just go to the editing menu on the left and click “add apps.”
This will pull up an apps menu you can search for special features that fit your business’s needs.
Each app includes features along with reviews from other Wix users. This gives you an opportunity to see what other people think of the app before you add it to your site.
Step 6: Add a Blog
Blogging is an important part of any business’s website. While your business may very well thrive without one, a blog is an easy and free way to advertise, share your expertise, and connect with your customers.
Unconvinced? Consider these business blogging stats:
- Websites that include a blog have 434% more indexed pages compared to sites that don’t have a blog.
- Businesses that blog get 97% more links to their sites compared to non-blogging peers.
- 77% of internet users say they read blogs.
- Businesses that blog get 2x the email traffic compared to those that don’t.
Fortunately, Wix makes it easy to add a blog to your new website. Just go to the main Editor menu on the left and click “start blogging.”
Wix offers some powerful options to make your blog an effective marketing tool. For example, you can link to your Instagram account to display the latest images from your feed.
You can also add a blog forum where customers can chat about your products and services.
Blogging for your business is optional, but you risk missing out on new customers and business opportunities if you skip this step.
You’re also missing out on powerful search engine ranking opportunities. All Wix plans come with basic SEO optimization features, including the ability to:
- Edit your post URL
- Set a special SEO title for search engines
- Add a post meta description
- Include image alt tags
You can do all of this right from the Wix post editor, making it extremely easy and straightforward.
On top of that, Wix offers site-wide SEO optimization capabilities, like AMP for mobile devices and schema markup to give search engines more information about your website.
With that said, if you’re not quite ready to add a blog to your site, don’t worry. Wix makes it easy to make changes down the road once your site is up and running.
Step 7: Set Up Your Online Store
Depending on what type of business you’re running, you might want to add ecommerce functionality to your website. This is where building your website with Wix pays off.
Wix lets you create an online store in seconds. To add a store to your site, go to the main menu on the left side of the Editor and click the “+” sign. This will give you a new menu with a long list of options. Scroll down until you see “store” and click it.
Next, click “add to site.” Wix will automatically generate a store and all its features, including product galleries, payment methods, and inventory management. Wix will also optimize your store for mobile users.
You can manage your store from the store dashboard, which gives you numerous customization options.
For example, from the “products” tab in the dashboard, you can add new products and relevant information, such as a price, SKU, product description, and how many you have on hand in your inventory.
Step 8: Optimize Your Website for Mobile Users
Mobile is the way of the future, which means your website needs to be easy for mobile users to navigate. Keep in mind that 81 percent of Americans own a smartphone, compared to just 35 percent in 2011.
Wix has you covered here, too. You can check out how your site looks on a mobile device by going to the top of the Wix Editor and clicking on the mobile phone icon.
This will switch you to mobile view, so you can see how your website looks on a smartphone. The good news is that Wix templates are usually already optimized for mobile search.
However, it’s still a good idea to scroll through your entire site to make sure all the pages look good on mobile. If you spot any design issues or odd text placement, you can change it in the Editor. Best of all? Changing elements in mobile view won’t affect how your site appears on a desktop browser.
Step 9: Select a Domain Name
You’re almost ready to publish, but first you need to select a domain name. Because you’re setting up a free Wix site, your options are somewhat limited here.
For example, your free Wix site can’t be a regular domain name like www.businessname.com. Instead, you’re required to include the Wix name in there. This means your domain will use the follow format:
www.username.wixsite.com/siteaddress
Fortunately, you can always upgrade your free Wix site to a paid version later on. When you’re ready to upgrade and switch to a custom domain, Wix offers some of the most competitive pricing anywhere.
Step 10: Publish Your Website
It’s time to go live with your new business website. This is where you should do one last preview to make sure your site is editing to your specifications and all the pages include the information potential customers need to make a purchase.
When you’re ready to launch your site into the world, simply click “publish.” If you need to make changes, you can always revisit your site in the Wix Editor.
To make any changes, just go to your dashboard, select “manage site” and then “edit site.” Once you’ve made the changes you need, click “publish” to make them live.
Conclusion
There you have it. Wix makes it easy and fun to create a website for your business. More importantly, it’s entirely free. With Wix, you can set up just about any kind of business site, including an online store that lets you start selling — and earning — in minutes.
Conclusion
There you have it. Wix makes it easy and fun to create a website for your business. More importantly, it’s entirely free. With Wix, you can set up just about any kind of business site, including an online store that lets you start selling — and earning — in minutes.


Posting Komentar
Posting Komentar